在Linux下用VNC远程桌面是个很不错的玩意。但在CentOS中默认没有安装VNC的。可以用下面语句查询,如果出现下面情况说明没有安装vnc
#rpm -q tigervnc tigervnc-server
package tigervnc is not installed
package tigervnc-server is not installed
1、安装VNC服务
yum install tigervnc tigervnc-server
然后就等待安装完成。
2、为vncserver设置周密码
[root@www.linuxidc.com ~]# vncserver
You will require a password to access your desktops.
Password:<输入vnc登录密码>
Verify:<再次输入vnc登录密码>
3、 配置VNC
为了防黑屏,需要修改一下/root/.vnc/xstartup。
注释下面两行
#xterm -geometry 80×24+10+10 -ls -title “$VNCDESKTOP Desktop” &
#twm &
然后再添加下面一行
gnome-session &
[root@GUOKE ~]# vi /root/.vnc/xstartup
#!/bin/sh
[ -r /etc/sysconfig/i18n ] && . /etc/sysconfig/i18n
export LANG
export SYSFONT
vncconfig -iconic &
unset SESSION_MANAGER
unset DBUS_SESSION_BUS_ADDRESS
OS=`uname -s`
if [ $OS = ‘Linux’ ]; then
case “$WINDOWMANAGER” in
*gnome*)
if [ -e /etc/SuSE-release ]; then
PATH=$PATH:/opt/gnome/bin
export PATH
fi
;;
esac
fi
if [ -x /etc/X11/xinit/xinitrc ]; then
exec /etc/X11/xinit/xinitrc
fi
if [ -f /etc/X11/xinit/xinitrc ]; then
exec sh /etc/X11/xinit/xinitrc
fi
[ -r $HOME/.Xresources ] && xrdb $HOME/.Xresources
xsetroot -solid grey
#xterm -geometry 80×24+10+10 -ls -title “$VNCDESKTOP Desktop” &
#twm &
gnome-session &
修改用户配置文件:/etc/sysconfig/vncservers
去掉下面这两行前的“#”,也就是说把这两行的注释给去掉。
VNCSERVERS=”2:root”
VNCSERVERARGS[1]=”-geometry 1024×768 -depth 32″
改完后的配置文件如下
[root@GUOKE ~]# vi /etc/sysconfig/vncservers
# The VNCSERVERS variable is a list of display:user pairs.
#
# Uncomment the lines below to start a VNC server on display :2
# as my ‘myusername’ (adjust this to your own). You will also
# need to set a VNC password; run ‘man vncpasswd’ to see how
# to do that.
#
# DO NOT RUN THIS SERVICE if your local area network is
# untrusted! For a secure way of using VNC, see this URL:
# http://kbase.redhat.com/faq/docs/DOC-7028
# Use “-nolisten tcp” to prevent X connections to your VNC server via TCP.
# Use “-localhost” to prevent remote VNC clients connecting except when
# doing so through a secure tunnel. See the “-via” option in the
# `man vncviewer’ manual page.
VNCSERVERS=”2:root”
VNCSERVERARGS[2]=”-geometry 1024×768 -depth 32″
4、改变xstartup的权限
chmod 777 /root/.vnc/xstartup
5、防火墙开端口,netstat -antpl查看可以发现有三个端口在监听。
5901 5801 6001
这三个端口:
默认的, vnc 服务监听3个TCP端口
RFB(Remote FrameBuffer)协议 默认端口 : 5900 显示器号
HTTP协议默认端口 : 5800 显示器号
X协议 默认端口 : 6000 显示器号
vncserver使用的显示器编号默认从1开始, 依次使用, 也可以参数指定端口号
我们只需要RFB协议就好了,所以,我们在防火墙中加5900到5903这几个,这样就可以开3个了。
vi /etc/sysconfig/iptables 找到下面的语句:
-A INPUT -m state –state NEW -m tcp -p tcp –dport 22 -j ACCEPT
在这之后填加:
-A INPUT -m state –state NEW -m tcp -p tcp –dport 5900:5903 -j ACCEPT
重起防火墙
service iptables restart
6、起动vnc服务器
/etc/init.d/vncserver start
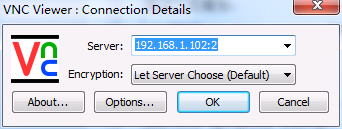
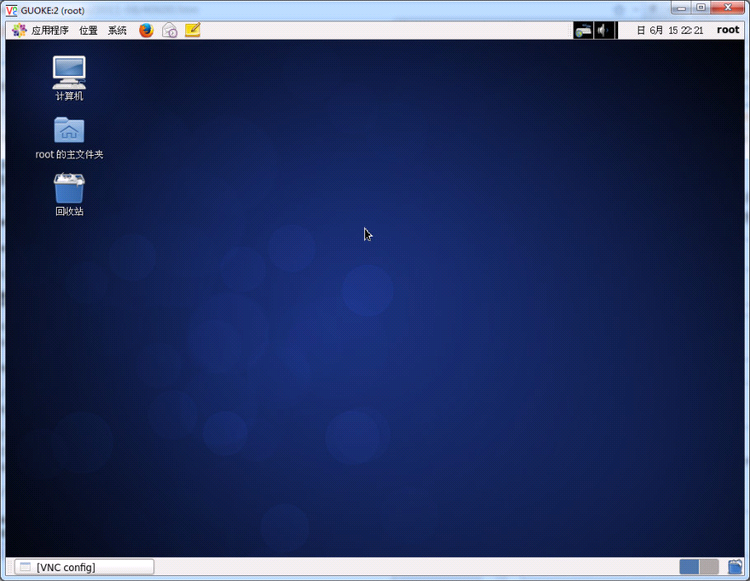
然后在windows中用vnc客户端登录
设置VNC服务随系统启动自动加载
第一种方法:使用“ntsysv”命令启动图形化服务配置程序,在vncserver服务前加上星号,点击确定,配置完成。
第二种方法:使用“chkconfig”在命令行模式下进行操作,命令使用如下(预知chkconfig详细使用方法请自助式man一下)
[root@testdb ~]# chkconfig vncserver on
[root@testdb ~]# chkconfig –list vncserver
vncserver 0:off 1:off 2:on 3:on 4:on 5:on 6:off
转载请注明:我的主页 » CentOS 6.5 安装VNC